If you have ever ordered a cover online and received something that was too big, too small, or just slightly off in all the wrong ways, you are not alone. It happens to thousands of people across the UK every year. The problem is almost never the cover itself. It is the measurements. When you order a custom cover from Curtains and Covers, we build it entirely around the dimensions you provide. That means getting your measurements right is the most important step in the whole process. The good news? It is easier than you think.
Here is everything you need to know.
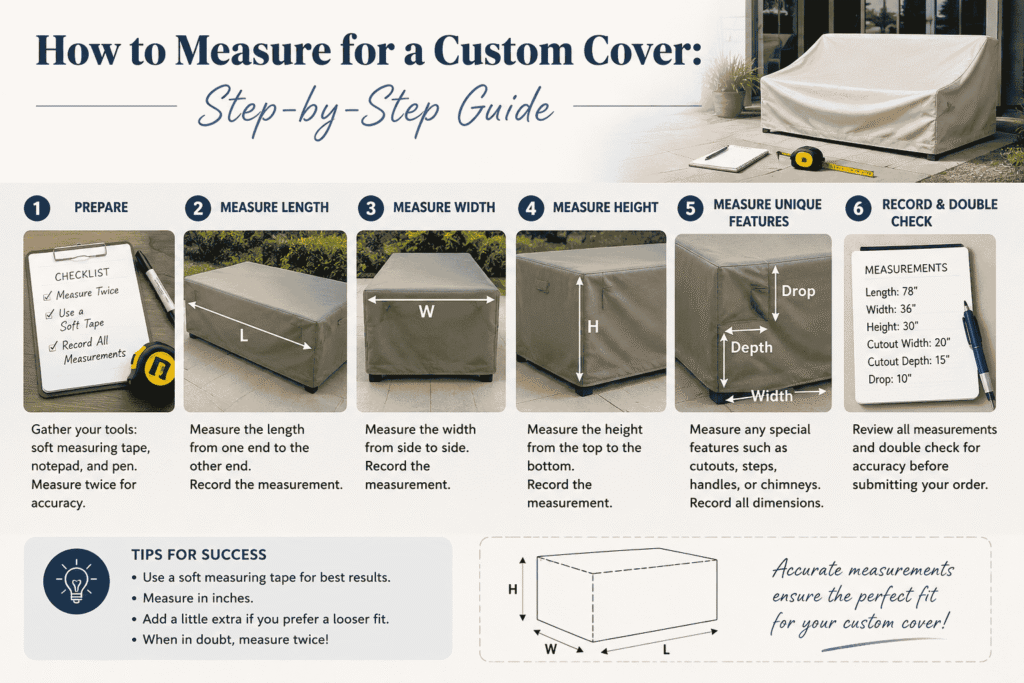
What You Will Need?
Before you start, grab a few basic tools:
- – A flexible tape measure (fabric or metal both work fine)
- – A pen and notepad or your phone to record numbers
- – A second pair of hands if the item is large
- Always measure in centimetres or millimetres. Avoid estimating or rounding up. Even a few centimetres off can mean a poor fit on a custom order.
Step 1: Identify the Shape of Your Item
Before measuring, look at the shape of what you want to cover. Is it a simple rectangle? Does it have an irregular shape, curves, or protruding parts like handles, knobs, or legs?
At Curtains and Covers, we offer 19 cover styles to match different shapes. Knowing your shape first helps you choose the right style on the product page before you start entering measurements.
Step 2: Measure the Width
Measure the widest point of the item from left to right. If the item has any parts that stick out at the sides such as armrests, side tables, or handles, include those in your measurement. Write this down. This is your Side 1 measurement.
Step 3: Measure the Depth
Measure the item from front to back at its deepest point. Again, include any protruding parts at the front or rear. This is your Side 2 measurement.
Step 4: Measure the Height
Measure from the ground (or the base of the item if it sits on legs) straight up to the tallest point. If the item has an uneven top, measure to the highest point. This is your Side 3 measurement.
Step 5: Measure Additional Sides If Needed
Some items have irregular shapes that require more than three measurements. For example:
- – L-shaped furniture sets need measurements for both sections separately
- – Equipment with sloped tops needs a measurement for the angled surface
- – Items with recessed bases need an additional base measurement
Our product forms include up to 10 side measurement fields so you can describe even the most unusual shapes accurately.
Step 6: Account for Clearance
A common mistake is measuring the item exactly and expecting the cover to fit over it. Custom covers need a small amount of clearance to slide on and off easily. As a rule of thumb, add 2 to 3 centimetres to each side for comfortable fitment. If you want a very snug fit, add just 1 centimetre.
Step 7: Double Check Everything
Measure twice before you submit. It takes 30 extra seconds and can save you time and money. Pay special attention to the widest and tallest points of your item. Those are the measurements that matter most.
A Quick Tip Before You Order
Take a photo of your item before you fill in the order form. If you are unsure about anything, you can attach the photo to your order or send it to our team. We are based in Liverpool and happy to help you get it right before production begins.
Conclusion
Accurate measuring is the foundation of a perfectly fitting custom cover. Take your time, use a reliable tape measure, and follow these steps one at a time. Once your dimensions are in, our team does the rest, cutting and hand-stitching your cover to exactly the size you need. No guessing. No ill-fitting covers. Just a perfect fit, every time